2010年1月25日 星期一

Linux Kernel: container_of 巨集

Linux驅動程式裡很常看container_of巨集,其目的為何呢? 假設Linux驅動程式只知道某一結構成員的位址,該驅動程式便可使用container_of巨集,將已知某一結構成員的位址計算出該結構的起始位址,其原型如下:


#define offsetof(TYPE, MEMBER) ((size_t) &((TYPE *)0)->MEMBER)

#define container_of(ptr, type, member) ({ \
     const typeof( ((type *)0)->member ) *__mptr = (ptr); \
     (type *)( (char *)__mptr - offsetof(type,member) );})


假設有一結構定義如下,且我們只知道phone_num成員的位址,如此便能使用該巨集計算出該結構變數的起始位址:


/* The student structure definition */
typedef struct student {
     char name[16];
     int id;
     char addr[64];
     char phone_num[16];
}STUDENT, *STUDENT_PTR;


該結構記憶體配置圖如下所示:


Figure 1. 結構記憶體配置圖

範例程式碼:

Figure 2. 範例程式碼


以此結構為範例來看containter_of巨集的兩行程式碼:

◎ const typeof( ((type *)0)->member ) *__mptr = (ptr); ==> 得到phone_num的位址 (x+84) ,請參考Figure 1跟Figure 2。
◎ (type *)( (char *)__mptr - offsetof(type,member) ); → (type *)( (char *)__mptr - ((size_t) &((type *)0)->member) ); ==> 其中((size_t) &((type *)0)->member)這段敘述代表以零為起始位址算出member這個成員的相對位址,即為phone_num成員的相對位址,也就是84 (請參考Figure 1)。所以整個敘述變成 (x+84) - 84 = x ,如此便能取得該結構變數的起始位址。


範例程式

2010年1月22日 星期五

Linux Kernel: Lookaside Cache (前瞻快取)

驅動程式往往根據使用者請求一次又一次地配置相同記憶體大小的物件。為此,Linux核心提供此需求的機制 - Lookaside cache。而此機制稱為Slab Allocator。

以SCSI驅動程式為例,當使用者要讀寫硬碟資料時,會由區塊裝置驅動程式 (Block Device Driver)向SCSI層發出請求,SCSI層將此請求轉換成SCSI command的結構 (struct scsi_cmnd),為了能快速配置與存取SCSI command,SCSI層驅動程式為每一個SCSI command結構配置lookaside cache。其用法如下:

1. 首先,必須先配置一個快取物件導向,其函式: struct kmem_cache *
kmem_cache_create (const char *name, size_t size, size_t align,
unsigned long flags, void (*ctor)(void *))


    ◎ name: 此快取物件名稱,此名稱會出現在/proc/slabinfo。
    ◎ size: 物件大小。
    ◎ align: 對齊字元數大小,通常為零。
    ◎ flag: 配置物件的方式,詳見include/linux/slab.h。
    ◎ ctor: 建構子函式位址。當核心成功地配置物件後,便會呼叫此函式。

2. 接著,呼叫kmem_cache_alloc,配置每一個物件,其原型: void *kmem_cache_alloc(struct kmem_cache *cachep, gfp_t flags);

    ◎ cachep: kmem_cache_create回傳的位址。
    ◎ flags: 詳見kmalloc的flags參數。

3. 釋放記憶體:
void kmem_cache_free(struct kmem_cache *cachep, void *objp)
→ 釋放物件,但並未釋放快取。
void kmem_cache_destroy(struct kmem_cache *cachep) → 釋放快取。


範例 (取自Linux SCSI驅動程式):


【Reference】
1. Linux Device Driver, third edition
2. Linux Kernel Source 2.6.31

2010年1月15日 星期五

Linux Kernel: __init, __initdata屬性

在trace Linux核心原始碼很常看到__init和__initdata兩個屬性。其原型如下:
#define __init __section(.init.text) __cold notrace
#define __initdata __section(.init.data)


只要函數被定義__init屬性,代表此函數的所有內容被編譯器放置在.init.text節區。此節區代表該函數只會執行一次,此後就不會再執行,因此執行完該函數,核心會將該函數所佔記憶體空間釋放出來。__init屬性非常適合裝置驅動程式的init_module函數,其範例宣告如下:
static int __init dm_init(void); (from linux-source-2.6.31/drivers/md/dm.c)


利用objdump觀察dm_init函數被放置在哪個節區:
adrian@adrian-laptop:/usr/src/linux-source-2.6.31$ objdump -x drivers/md/built-in.o | grep md_init
00000000 l F .init.text 000000de md_init
00000000 l O .initcall4.init 00000004 __initcall_md_init4


__initdata屬性跟__init屬性的作用大同小異,唯一不同在於前者放置在.init.data節區。

範例:
static int (*_inits[])(void) __initdata = {
     local_init,
     dm_target_init,
     dm_linear_init,
     dm_stripe_init,
     dm_kcopyd_init,
     dm_interface_init,
};

利用objdump觀察_inits變數被放置在哪個節區:
adrian@adrian-laptop:/usr/src/linux-source-2.6.31$ objdump -x drivers/md/built-in.o | grep _inits
00000000 l O .init.data 00000018 _inits


問題來了,釋放記憶體的工作由核心的哪一函數負責呢? 答案是: free_initmem (arch/x86/mm/init.c)

【Reference】
FAQ/InitExitMacros
Linux Kernel Source 2.6.31

An Introduction to Linux Kernel Booting Sequence Part 3

上篇文章提到go_to_protected_mode函式最後會執行由組合語言所撰寫的函式protected_mode_jump,此函式工作如下:


函式呼叫原型:
protected_mode_jump(boot_params.hdr.code32_start, (u32)&boot_params + (ds() << 4));

其程式碼:

/*
* void protected_mode_jump(u32 entrypoint, u32 bootparams);
*/
GLOBAL(protected_mode_jump)
movl %edx, %esi # Pointer to boot_params table

xorl %ebx, %ebx
movw %cs, %bx
shll $4, %ebx
addl %ebx, 2f
jmp 1f # Short jump to serialize on 386/486
1:

movw $__BOOT_DS, %cx
movw $__BOOT_TSS, %di

### 設定x86之cr0暫存器的PE位元,如此便能進入proctected-mode
movl %cr0, %edx
orb $X86_CR0_PE, %dl # Protected mode
movl %edx, %cr0

# Transition to 32-bit mode
.byte 0x66, 0xea # ljmpl opcode
2: .long in_pm32 # offset
.word __BOOT_CS # segment
ENDPROC(protected_mode_jump)

.code32
.section ".text32","ax"
GLOBAL(in_pm32)
# Set up data segments for flat 32-bit mode
movl %ecx, %ds
movl %ecx, %es
movl %ecx, %fs
movl %ecx, %gs
movl %ecx, %ss
# The 32-bit code sets up its own stack, but this way we do have
# a valid stack if some debugging hack wants to use it.
addl %ebx, %esp

# Set up TR to make Intel VT happy
ltr %di

# Clear registers to allow for future extensions to the
# 32-bit boot protocol
xorl %ecx, %ecx
xorl %edx, %edx
xorl %ebx, %ebx
xorl %ebp, %ebp
xorl %edi, %edi

# Set up LDTR to make Intel VT happy
lldt %cx

## 跳至code32_start的標籤
jmpl *%eax # Jump to the 32-bit entrypoint
ENDPROC(in_pm32)


至於code32_start在哪裡呢? 此標籤定義在arch/x86/boot/header.S,如下所示:


code32_start: # here loaders can put a different
# start address for 32-bit code.
.long 0x100000 # 0x100000 = default for big kernel


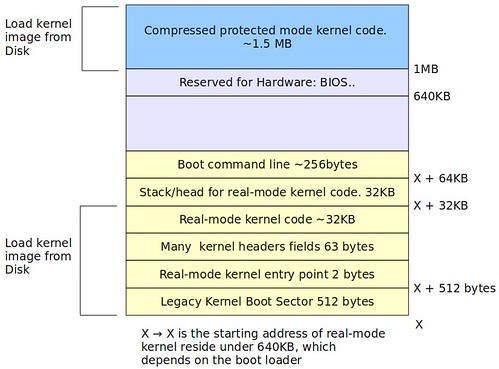
也就是說,核心已做完real-mode Linux程式碼該做的事情,並跳至protected-mode Linux程式碼的起始位址 (1MB),請看下圖:

linux kernel ram content after loading the image into the ram

[Reference]
【The Kernel Boot Process】
【Linux Kernel Source 2.6.31】

2010年1月12日 星期二

An Introduction to Linux Kernel Booting Sequence Part 2

上篇文章Linux核心被載入記憶體並執行start_of_setup標籤(arch/x86/boot/header.S),在start_of_setup標籤末段會執行由C語言撰寫的main函式 (arch/x86/boot/main.c),此函式工作如下所示:

1. 複製開機標頭 (boot header) 至 zero page
2. 設定heap_end變數
3. 偵測記憶體layout
4. 設定鍵盤重複率 (Keyboard Repeat Rate)
5. 查詢MCA (Micro Channel Architecture) 資訊
6. 查詢Intel SpeedStep
7. 設定video模式
8. 進入protected-mode (go_to_protected_mode,arch/x86/boot/pm.c)

其中3-6項,經由BIOS呼叫 (intcall,arch/x86/boot/bioscall.S),以便向BIOS取到相關的資訊。
main函式最後呼叫go_to_protected_mode函式,以便從real-mode轉換至protected-mode。

在真正進入protected-mode之前,有幾項工作必須先被執行,也就是go_to_protected_mode函式裡所做的事情,如下所示:

1. 設定A20位址線,如此便能存取超過1MB以後的資料 (因為在real-mode,只能存取1MB以下的資料)。

2. 設定idt (interrupt descriptor table)。在real-mode,interrupt vector table的起始位址是從記憶體零的位址開始算起。然而,在protected-mode,interrupt vector table是儲存於CPU的暫存器 (IDTR,Interrupt Descriptor Table Register),因此轉換至protected-mode之前,必須先設定idt。

3. 設定gdt (global descriptor table)。由於,real-mode與proctected-mode位址轉換 (由邏輯位址 [logical address] 轉換成線性位址 [linear address]),詳見x86_memory_segmentation。因此轉換至protected-mode之前,必須先設定gdt,以便能正確地根據logical address轉換成linear address。


在go_to_protected_mode函式最後會執行由組合語言所撰寫的函式protected_mode_jump,此函式便是設定CPU為protected-mode,細節留到下回做進一步解釋。

【Reference】 The Kernel Boot Process