其中, 假設BIOS跟Boot Loader (GRUB, for example) 運行正常, 且Boot Loader已將核心 (/boot/vmlinuz-2.6.31-16-generic) 載入記憶體並跳至載入記憶體之起始位置執行.
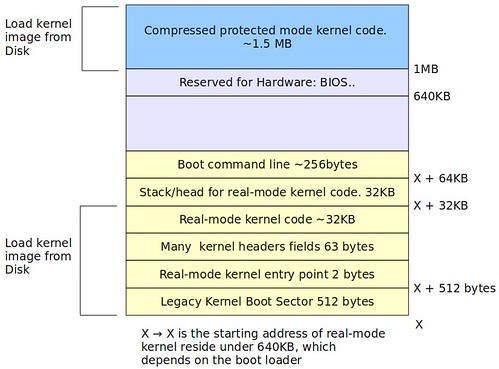
Linux核心主要可以分為兩大部份: 1. 執行於CPU之real mode的核心程式碼 2. 執行於CPU之protected mode的核心程式碼. 然而這兩大部份被載入至不同的記憶體區段: 1. real mode核心程式碼載入至0-640KB的某一區間, 2. protected mode核心程式碼載入至1MB記憶體位址. 如下所示:

Figure 1. Linux kernel RAM content after loading the Linux kernel image into RAM
首先第一個被執行的Linux核心檔案為arch/x86/boot/header.S,此檔案由組合語言所撰寫,此檔案前512位元組 (其中有15個位元組為核心標頭) 為早期的核心開機磁區,但現今的boot loader直接跳過此512位元組。緊接著在512位元組之後,即為Linux核心執行的起始點,底下展示此起始點的兩行程式碼 (以Linux核心原始碼版本2.6.31為例):
.byte 0xeb # short (2-byte) jump
.byte start_of_setup-1f
此兩行代表跳至start_of_setup標籤。".byte 0xeb" (arch/x86/boot/header.S:112)代表two-bytes jmp組合語言指令。".byte start_of_setup-1f" (arch/x86/boot/header.S:113)的"f"代表forward short jump,"start_of_setup-1"代表用"start_of_setup" (arch/x86/boot/header.S:241)標籤起始位址減去"1" (arch/x86/boot/header.S:114)標籤起始位址。
所以上述兩個位元組即代表: 以目前的位址向下跳至n個位元組 (即start_of_setup-1),因此便能正確地跳至start_of_setup標籤。
範例 (以Ubuntu 9.10之2.6.31-16-generic核心為例)
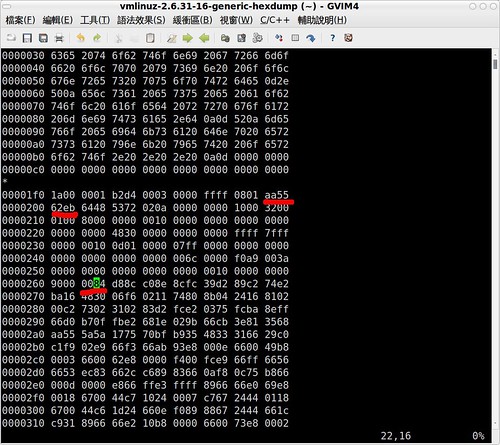
此範例利用hexdump將Linux核心dump出來,並觀看其16進制碼用以對照上述之論述。
adrian@adrian-desktop:/boot$ hexdump vmlinuz-2.6.31-16-generic > ~/vmlinuz-2.6.31-16-generic-hexdump
adrian@adrian-desktop:/boot$ gvim ~/vmlinuz-2.6.31-16-generic-hexdump
其結果如下所示:

Figure 2. Hexdump from Linux Kernel
其中,0xAA55為Linux早期的核心開機磁區最後一個位元組(第512個位元組,arch/x86/boot/header.S:103)。0x62eb代表往下跳至62個位元組,即0x00000262位址。
本篇文章只介紹Linux之real-mode核心程式碼的entry point,往後會有陸陸續續的文章繼續探討。
【Reference】
The Kernel Boot Process


